Showing posts with label dinner. Show all posts

Sunday, August 14, 2011

Western Europe - Gazpacho (Spain)

I can't remember the last time the high temperature for the day involved fewer than three digits.  Of course, this isn't a surprise.  What is a surprise, though, is that this summer doesn't seem nearly as bad as my previous Phx summer, during which I spent much of my time begging for the sweet release of death, or maybe just a cold spell.

I haven't been able to figure out why I'm tolerating this go-around better.  Has this summer been less horrible?  Or, God forbid, am I getting used to this?  I mean, it is still all quite terrible, and I have been dreaming of fall ever since July, but I do feel like I've been less angry at the weather this year.  Maybe I'm just mellowing out in my old age?  The mind boggles.

The other possibility is that I've learned how to better co-exist with the blistering heat, in that I no longer do things like try to bake bread in an oven that expends more heat than it uses to actually cook things.  We've changed our dining habits to better include foods that don't require constant hovering over the stove or that can be made in non-stove appliances (like toaster ovens).

The best way to win the food battle against the sun, however, is to just eschew cooking at all.  Enter gazpacho!  No heating elements are required, and it's fantastically simple and easy.  This recipe was given to me by a friend from Spain, and it's actually her mother's recipe, so you know it's legit.

First, you're going to need tomatoes.  A lot of tomatoes.  At least two pounds.  Lucky for those of you who live in areas with normal growing seasons, you should be flush with tomatoes now.  I used Roma tomatoes, because they are good and meaty, but any tomato, so long as it is fresh and ripe, will do.  You can even mix tomatoes, if you are into that sort of thing.  Quarter and de-seed your tomatoes (you can also peel them, if you're dedicated).  De-seed and roughly chop both a green and a red bell pepper, along with a cucumber (I used a Striped Armenian cucumber, which didn't require de-seeding, but if you're using a standard hothouse cuke with large seeds, you might want to de-seed this as well) and about 1/4 an onion.  Peel some garlic, as much as you'd like (I was told that proper gazpacho should be right garlicky, so I used almost an entire head).

Blend all the chopped veggies together in a food processor to your preferred chunkiness (depending on the size of your food processor [or the amount of vegetables you're starting with], you may need to do this in batches).  I like my gazpacho hearty, so I only run the food pro until everything is just diced, but if you want a smooth soup, let it go for longer and use a food mill to strain out the seeds and skins (you can also add a little water to each batch if you want to thin it out a bit).  Mix in vinegar (I used apple cider vinegar) and salt to taste; note that the vinegar flavor will become more pronounced after it has chilled, so stop just before you get to your preferred tang, and don't be surprised if you need a lot of salt—it can take it.  Pop it into the fridge for 15–30 minutes to chill and allow the flavors to meld together (you can certainly leave it for longer, if you want a really cold soup).
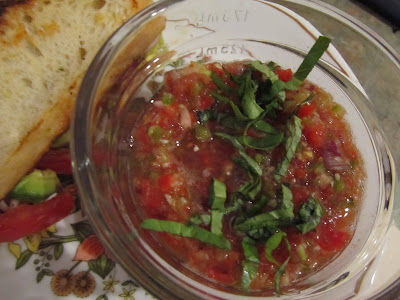

You can drizzle a bit of olive oil over the top, or add ribbons of fresh basil (as I did).  Served with a grilled cheese sandwich, it makes for a refreshing lunch or dinner on a triple-digit summer's day/eve.  Take that, desert heat!

Friday, July 29, 2011

Central + South America - Gallo Pinto (Costa Rica)

Costa Rica is known for many things: eco-tourism, active volcanoes, coffee, cloud forests, fruit, hummingbirds, not having an army, etc.  One thing isn't really known for, however, is food (though eating fresh fruit every morning for breakfast is pretty fantastic).  I guess they just spent too much time creating a stable democracy to worry about snack time?  And this isn't just me making up facts to suit my narrative; when asked to make a Costa Rican dish, my sister-in-law, who is from Costa Rica and therefore my authority on Costa Rica, explained that Costa Rica doesn't really have a food.  The food is just sort of is, I guess.  However, on our trip to Costa Rica, I came away with two new food-related loves:  jugo de naranja y zanahoria (orange–carrot juice) and gallo pinto.  (Incidentally, I also came back from Costa Rica with my first lesson in fresh pineapple preparation, as I may have purchased one from the store and realized too late that I didn't actually know how to operate a whole pineapple, and my sister-in-law's mother was kind enough to show me how it's done.)

Gallo pinto (which means "spotted rooster" in Spanish), is pretty standard breakfast fare, though I usually make it for dinner (and then eat the leftovers for breakfast the next day).  It's little more than black beans and rice, though it is better if you reconstitute dried beans (because the cooking liquid is where much of the color of the rice comes from), so you'll need at least some amount of forethought for the bean soaking (unless you have a pressure cooker, like we do, which we got because we are very bad at planning).  This recipe is based on the one my sister-in-law gave me, but it's endlessly adaptable.

Start off with 1/2 c. (or a few handfuls—be daring!) of dried black beans.  If you are on top of things, you can soak them overnight; otherwise, pressure cook (or simmer) until they are done (you don't want them mushy—they should retain their shape).  I usually add a dried chipotle pepper to cook with the beans, because I like the hint of smokiness it imparts, but it's not necessary.  Make sure you reserve the cooking liquid, because it's full of tasty goodness.  You'll also need to cook up some rice, about 1/2 c. (I like a 1:1 bean–rice ratio, with a slight advantage to the beans).  White rice will absorb the most color, but I use whatever is on hand, which is usually a long-grain brown rice.

Next, finely dice half an onion, half a red bell pepper, and a small handful of cilantro.  I like to do a rough chop of the onion and pepper, then add the cilantro and finely chop it all together, to help blend the flavors a bit.  Costa Rican food, traditionally, isn't very spicy, but you could certainly add a hot pepper of your choice here, or a clove of garlic, though not too much, because you want the flavor of the beans to shine through.

Once the rice is done, heat up a small amount of oil (grapeseed or a mild olive) in a large saute pan on medium heat.  When the oil is hot, add the rice and stir frequently until the rice is shiny.  Add half of the onion/pepper/cilantro mixture and give it a good fryup until the vegetables are softened.  A splash or two (or three) of the bean cooking liquid goes next, which should be allowed to cook off, leaving concentrated flavor and color to the rice.  Mix in the beans and remainder of the vegetables, stirring to incorporate everything and heat the beans through.  Season to taste; it can take a fair bit of salt (as beans often can).  Salsa lizano, which to my understanding is the Costa Rican equivalent of butter mixed with crack in the sense that it goes well with everything, is a traditional addition.  I, sadly, did not have any, but old Worcestershire sauce is an acceptable substitute (if you are one of those vegetarians who are OK with the odd anchovy, and the vegetarian version works too if you're not).

¡QuĂ© delicioso!

Gallo pinto is normally served with eggs, fruit, and a big cup of coffee.  I don't drink coffee, but an open-faced gallo pinto/huevo frito/aguacate sandwich is still pretty fantastic.  Not being what you'd call a morning person, I usually have gallo pinto for dinner, along with a couple of tortillas (and more avocados, if I am so lucky). 

Volcan Arenal, which is definitely active, since we saw it erupt.

And if you happen to be sitting under an active volcano during breakfast, so much the better.

Just so we're clear, I kept on hiking after this sign.  At least until the gate guarded by angry horses.

Um, maybe.

Wednesday, July 27, 2011

The Middle East - Falafel (Multinational)

I ate my first falafel in college.  I know, it's a big shock that small-town Western New York wasn't rocking the crunch patties and flavor sauce back in the day, but it's true.  I was a sophomore, at an accepted student event (where you could frequently find me, considering that I was both an indentured servant to the Admissions Office and a fan of free food).  At the buffet, there were these little crispy things that a friend swore were delicious, so I tried one.  Sweet merciful kittens, it was terrible.  Dry and flavorless, I was concerned that I had somehow screwed up and was eating it incorrectly, because I couldn't fathom why my friend would steer me to try something this bad.

Fast forward several years.  By this point, I had gone vegetarian, and The Husband (then The Boyfriend) insisted that I try falafel again.  He offered to make me some, and we acquired a falafel mix.  While these weren't nearly as dry as I remembered, they still weren't good.  The Husband insisted that a well-made falafel was good, and that I would probably enjoy one, given how much I enjoy hummus and tzatziki.  I assumed he was lying, though I did agree to try falafel a few more times, even though I was consistently disappointed.  What can I say:  I'm an eternal optimist.  (Ha.)

Fast forward another couple of years.  We had moved to the desert and were leaving the farmers' market, when we noticed a stall selling Middle Eastern food.  We decided to get pita wraps for dinner, but to my horror, the only vegetarian option was falafel.  However, the falafels didn't look like the ones I was used to; they weren't deep-fried to the point of carbonization, but instead just lightly browned.  Plus, I was really hungry.  So I knuckled down and bought one.  It was a revelation.  I'm pretty sure we had each finished ours before we made it the four blocks home (and if you know The Husband and the speed at which he eats, that's saying something).

Having discovered that falafel need not be dry and boring, I decided that I should probably learn how to make them.  My method is a bit of an amalgam of various recipes, supplemented with my natural predilection for making things up as I go along.  I am a firm believer in using fava beans, as I think they provide a more complex flavor than the straight-chickpea route.  I also add bulgur, which according to my (very brief internet) research means they are Israeli, even though the addition the favas sort of negates that.  Consider this falafel as a food without a country.

While everything comes together relatively quickly once all the ingredients are present and accounted for, you will need to plan at least 24 hours ahead (to allow the beans time to soak).  You can also make the falafel mix in advance, but don't cook the patties until just before you plan to eat, as they tend to dry out.

To make your falafel, put a half-cup each of dried fava beans and dried chickpeas into separate medium bowls.  Fill the bowls with enough water to cover the beans by an inch or so, then leave to soak overnight.  The beans should roughly double in size.

Next is the most tedious part of falafeling:  shelling the favas.  Fava beans are shell beans.  When found in the wild (or at the store), they need to be removed from the pod (much like peas); unlike peas, the individual beans must also be shelled.  The same holds true for dried favas.

To the left:  unshelled.  On the right:  totally nude.

Some of the favas may have split during the soak, but for those that haven't, shelling is easy:  using a small, sharp knife, make a shallow cut along the end of the bean opposite the little black line (originally the point where the bean was attached to its pod), then peel off the shell.  If the beans are well soaked, the skin should come off without much fuss.  You can also purchase already-shelled dry fava beans, but they are more expensive and a bit tougher to find and where's the fun in that?

Once the favas are peeled, drain the chickpeas, give both sets of beans a good rinse, and add them to the bowl of your food processor.  Roughly chop half an onion and toss that in, along with a few cloves of garlic.  A pinch or two of cumin and some chili powder (I like Aleppo) won't go amiss, nor will a handful of raw coarse bulgur.  Tear up a handful each of parsley and cilantro, and add to the bowl.  Salt and pepper generously, then whiz the whole lovely mess until it's good and mixed.  Aim for a medium grind; if you find everything is a little dry, you can add a drizzle of olive oil or a tiny bit of water, but not too much — you don't want it to be too wet or turn into a puree — the liquid from the soaking should be enough.  The resulting batter should be sticky enough that you can easily form a patty, but dry enough to maintain its shape.

Once the mix is ready, heat a tablespoon or two of grapeseed (or similar) oil in a large pan over medium heat; I like one with sloping sides, to help with the flipping.  When the oil is hot, add the falafel patties one at the time, making sure not to crowd the pan.  Let them cook until brown on the bottom, maybe five minutes, then flip.  Cook until the other side is also browned and crispy, and serve.  This recipe should make a dozen or so small falafel patties.

Two competing schools of falafel construction:  the manageable (mine, below), and the chaos-in-a-pita (The Husband's)

We usually make our falafel pitas with homemade hummus, tzatziki, and cucumber-feta-tomato salad; last time, I added some broccoli slaw for a bit of crunch.  Any number of toppings could work:  baba ghanoush, tahini, harissa (for some kick), Greek dressing, a squeeze of lemon, spinach, plain yogurt, pickles, relishes...  You could also crumble the falafel into a salad, or make larger patties and grill them like a burger.

THE POSSIBILITIES ARE  ENDLESS.

British Isles - Bubble and Squeak (England)

Bubble and squeak was always going to end up here, it being one of my favorite dishes and also an excellent non-scone recipe for the UK/Ireland section.  However, I did not expect it to appear so soon.  The original plan was to have most, if not all, regions in possession of at least one recipe before I moved to double representation, but as I have been learning, very little of this blog adventure has been going according to plan.  The Husband was recently in need of simple, tasty food, and we had half a head of cabbage about to go bad.  So here we are.

Bubble and squeak is, at its core, a recipe for the using up of leftovers, specifically those from a traditional English roast dinner.  Similar dishes abound throughout Europe, but the two that matter for the purposes of this post are colcannon, from Ireland, and — I kid you not — rumbledethumps, from Scotland.  (RUMBLEDETHUMPS!  Is that not just the most delightful thing ever?  And now you know why I adore Scotland so.)  There are a few minor differences (colcannon substitutes kale for cabbage, and rumbledethumps(!) involves cheese), but all three dishes are basically just potatoes, a leafy green, and copious amounts of sweet, sweet butter.   For the etymology nerds out there, bubble and squeak takes its name from the sound that the food makes while cooking.   Colcannon is derived from cole, meaning cabbage; rumbledethumps comes from rumbled, for food that has been mashed or scrambled, and thumps may refer to the fact that, originally, this dish was made by bashing the daylights out of the potatoes and cabbage with a large pestle. 

I first discovered bubble and squeak in a cookbook I bought ages ago, which was purchased mostly for the introductory sections (discussions various grains, oils, beans, etc., with lots of pretty pictures).  I can't remember a single other recipe from said cookbook, and it was given away during the Great Purge of 2009, but because it introduced me to bubble and squeak, I will always think fondly upon it.  Godspeed, forgotten cookbook, wherever you are.

My recipe is slightly different from some of the more traditional ones I've uncovered, but its heart is in the right place.  It's a very simple recipe, with few ingredients; if you find yourself with leftover mashed potatoes and greens (or any vegetable, really), this should come together in a flash.  This means you can also prepare the potatoes and/or the vegetables ahead of time, or even cook the entire dish the day before; it reheats wonderfully.  Also, as a side note, one of my all-time favorite cooking shows, Two Fat Ladies, insists that you must use lard or drippings in this dish, as they are the only fats that can heat up enough.  This is a load of old rubbish.  While I'm sure that bacon fat is wonderful stuff, butter does just fine.

Get yourself a couple of medium-sized potatoes; I prefer russets, but any starchy potato will do nicely.  Since I think the skin is the best part of a potato, I give them a good scrub and then chop them into one-inch chunks.  (Peeling the potatoes is fine, as is leaving them whole — I just find that chopping them up speeds up the cooking process.)  Plop them in a large pot with some well-salted water and boil under tender.

While the potatoes are boiling, thinly slice two leeks and a half a cabbage.  Melt a good dollop of butter in an oven-safe pan (I use my trusty 10 1/4" cast iron skillet) over medium heat, and saute the leeks until translucent (a finely-diced clove or two of garlic wouldn't go amiss here, either).  Add the cabbage, cover, and cook until tender.

Once the potatoes are done, drain, add a slosh of milk (or cream, if you are devilish) and a good knob of butter, then mash.  Lumps are perfectly fine, but just make sure it's easily mixable.  Salt and pepper to taste.

When the cabbage is ready, add a few handfuls of spinach and cook until just wilting, which will take but a minute or two.  Add the greens into the potatoes, return the skillet to the heat, and add another dollop of butter to melt.  Mix the greens and potatoes together until everything is relatively well incorporated, then pour it all back into the skillet.  Even out the potato mixture, much like you would cake batter in a pan, and let cook until the sides and bottom have browned.  (This is when the bubbling and squeaking will occur; if you find that your dinner is not singing to you on the stove, it's a good sign that the heat may not be high enough.)  You can add a few additional dabs of butter along the top of the potatoes, as well as some more salt and pepper, if you'd like.

While the bubble and squeak is a-bubblin' and squeakin' away, turn on your broiler to heat up.  Once the potatoes are nicely brown and crisp, pop the skillet under the broiler for a few minutes, until the top is also brown and crisp.  Let sit for a few minutes to cool, then serve.

Half a pan of bubsqueak, because we are impatient when butter is involved.

The Husband and I have been known to enjoy the odd bubble and squeak as part of a brunch spread (where it once accompanied potato-leek soup, because we enjoy repetition), but it is also an excellent meal in and of itself, particularly suited to cold, grey days (of either the weather or temperament variety) where warmth and heartiness (and butter) are much appreciated.